
Installing Wallpaper
Accessories Needed
- Cutter (with spare blades)
- Adhesive (powder or ready-mixed)
- Measuring Tape
- Paint Roller (for applying adhesive)
- Steel Ruler
- Plastic Scraper
- Pasting table
- Floor Protector
- Pail
- Brush
- Water
- Sponge
- Clean Cloth
Surface/Wall Preparation
- Remove all existing wall covering and backing papers, ensure the surface is clean, dry in depth
- Brush off all dirt and loose material with a stiff bristle brush and all surface contamination such as dirt, grease, polish, water-soluble stains, felt tip pen marks, etc., should be removed by washing with a detergent solution, rinsed off with clean water and allowed to dry
- Any holes, cracks of defects to be filled flush with good quality filler.
- Mould and algae should be treated with a fungicidal wash and allow it to dry well
- Always ensure good lighting, which is required for proper inspection before, during and after hanging.
Step-by-step Guide
- Check to ensure the product you have is sufficient for the installation space and are of the same batch and/ or lot number. Differing batch or lot number can create slightly uneven color consistency or shading issues when installed.
- Check out the video below to have a better idea of installing wallpapers.
TIP – How much to Buy?
Wallpapers come in 21-inch rolls, which covers approximately 57 sq.ft. per roll. So for a 200 sq. ft. wall, you will need 3.5 rolls (or 4 rolls with wastage)
- All wallpaper design comes with a special guide on the installation methods, always identify on the type of wallpaper, backing, and surface, which it may help in many ways to understand on dos and don’ts of a specific wallpaper.
TIP – Paper-Backing?
Deco2U wallpapers are paper-backed, which means adhesive must be applied on the paper, and allowed to rest for 20 minutes before hanging
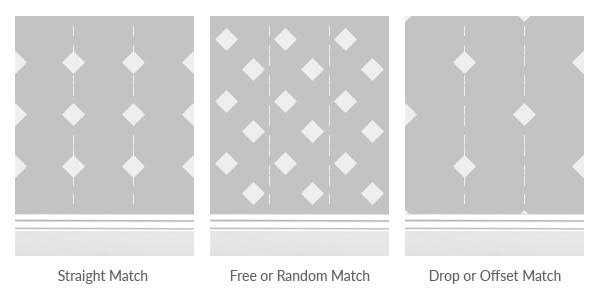
- Do note the pattern repeat of your wallpaper. This is usually indicated on the label of your wallpaper packaging. Pattern repeat indicators ensure you are correctly matching the design elements on your wallpaper, here are some common wallpaper pattern repeats and how to match them:
- Cut the wallpaper into strips based on the height on your wall, be sure to have at least 2 inches of allowance at both ends. Now arrange the strips on the floor and match the patterns. This step allows you to plan and ensure you know how to match the pattern when hanging later.
- Apply adhesive on your wallpaper using a paint roller. Ensure a generous, yet even and smooth coat. Now allow for a booking time of at least 20 minutes prior to hanging.
- Install the wallpaper one strip at a time. Leave an extra of 2 inches of a wallpaper at the above between the ceiling and wall, and later after all the wallcovering installation is done, trim the extra bits with a cutting blade to create a neat finishing touch.
- Be sure to smoothen as you install with a pliable plastic scraper from the centre outwards to eliminate creases and air pockets. Take care not to squeeze out all the adhesive from the backing of the wallpaper to the surface and always ensure do not overwork on the joints, as it may cause damage.
- Wallpaper seams are either overlapped or butt joined, in both cases be sure to use a sharp cutter when cutting or trimming to ensure a neat and clean finish.
- Remember to clean all excess adhesive on the surface with a wet sponge, and thereafter immediately wipe down with a dry cloth.
Wallpaper Care & Maintenance
General Care Tips
- Clean dust, stains and debris as soon as spotted
- When cleaning, the wiping direction should be from bottom to top to protect the baseboard and prevent streaking
- Ensure to wipe in the direction of the vertical seems
- Dry dust can be wiped off using a dry cloth
- Spot clean by wiping off fingerprints and other smudges around light switches
- Stubborn stains can be wiped off using a clean, damp cloth
- Finish one section at a time, let it dry and work on the next section
Precautions
- Do not use abrasive cleaners or detergents as they may ruin the wallpaper
- Do not use active solvent-based cleaning agents, chemical based ingredients, lacquer thinners and/or nail polish removers
- Avoid products that contain bleach as they will damage the wallpaper print and finish
- Do not use hard scrubbers on the wallpaper as they may scar the surface
- Make sure not to over-wet the wallpaper, especially at the seams